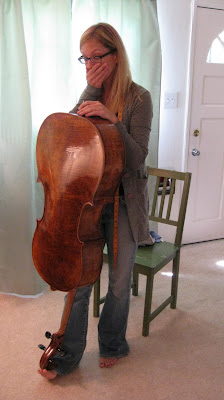
It’s funny that Cello Muser, aka @risktical asked for a post on periodic cello maintenance because until recently, I hadn’t been doing too much of that. In fact, I had been on the ignorant side of many things cello, like what kind of wood is used for the various parts (in response to a 9 year old asking “what is a cello made of?” I said, “Norwegian wood?” and hoped a Beatles reference would get me by), what options I have for a bridge (French? Belgian?) and other things of the sort. My ignorance did not leave my cello wholly neglected, as my travels to the UK earned me an in-flight smashed bridge, which resulted in a lot of work done in London. Then I moved to Manchester, where I lived within eyeshot of a violin repair shop, so I had him look it over from time to time. Then I came back and flirted with selling it, so Craig made another bridge and looked at the seams for any explosions waiting to happen. I started picking up some studio work a few summers ago, and cellists tend to geek out and talk gear on the breaks, so once again, my cello went into the shop for a new endpin and some other stuff.
Still, there are a few things to do more routinely, and you shouldn’t need something as perfunctory as a smashed bridge to keep your instrument running well.
Every day
1) With a clean lint-free cloth, de-gunk your fingerboard. That black stuff is oxidized finger oil, and it slows you down. Common sense: wash your hands before you play!
2) With another cloth, clean the rosin off of your strings. Left unattended it looks to revert back to its sappy form and is not only corrosive to the strings, but can shorten the life of a rehair by providing too much traction and ripping bow hair out. The another cloth part is important: if you use the same cloth to clean your strings and then your fingerboard, you’re essentially depositing rosin where your hands go, and they’ll eventually find your skeletal remains in your practice room, metronome diligently plugging away, your left hand permanently stuck to the cello and a note saying, “I should have listened to Emily.”
Every week
1) Check your bridge for any excitement. My last bridge had the enticing habit of stepping one foot slightly askew and then bending backwards on the other side. Not only does that make intonation a bit more adventurous, but also unevenly spreads the enormous pressure of the strings across the face of the cello. If you see anything zesty, the best option is to take it to a shop. I just don’t like messing with it, although if it’s simply pulling towards the fingerboard, I will loosen the strings about a whole step or two and gently push it back into place, bracing the back side and pushing with my thumbs. This is especially easy if you fail the paper test: try to push a piece of paper against the feet of the bridge. If they are flush, you won’t be able to put the paper under them. Failing the paper test means the whole bridge is rocking one way or the other. If the feet are flush but the top has twisted, that’s best left to a luthier, who can put it in a press for a while.
2) Look your strings up and down for uneven wear. This happens at the nut an awful lot, where you’ll see the string all chewed up as it enters the peg box. If you’re not precious about these things, you can take a sliver of sandpaper or very thin emery board to the offending spot that is causing the problem. You can always take a pencil and line the places that cradle the strings with a layer of graphite. While it’s not perfect, it makes that little channel a little more slippery and less snag-inducing. You can also ease sticking pegs this same way.
3) Sometimes it helps to make sure your cat is consistently sized.
Every month
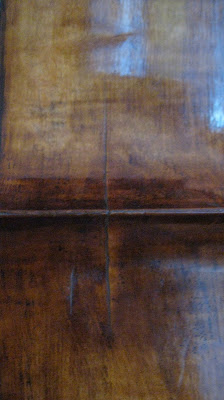
1) Look over all of your seams and old cracks to make sure prior repairs are holding up. Turn the cello on its head (on carpet) and have a look at the bottom. Shine a flashlight around the edges and into the F holes and see if there’s any bleed. Most of the time we can tell if we have a seam open because there’s a buzz or rattle. I discovered a hole while we were taking the pictures!
Here’s an old crack that has held up well:
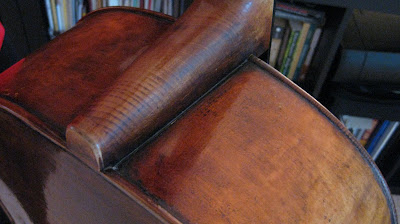
2) Look where the neck is seated into the shoulders of the cello. This piece can tug sometimes and is very vulnerable to ripping right off if the instrument is dropped. I have had it happen to 2 different instruments (including this one) and many students who own used instruments that have been repaired need to keep looking to make sure changes in weather and accidental bumps and bruises don’t unseat this crucial area
. Tell tale signs include cracked or mismatched varnish and an awkward looking angle of entry into the body of the cello.
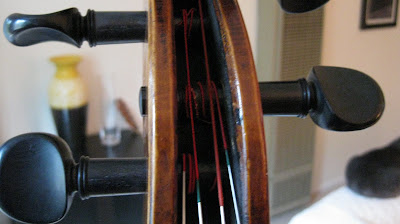
3) Look into the pegbox and check that there is no unusual wear due to the string rubbing on the shaft of the peg.
4) If your bridge is prone to bending, chances are the feet also like to move. The next time you’re at the shop (or if you live too far from a shop for this to be practical, when you feel like things are set up well) have them measure the distances of the feet relative to each divot in the f hole (this distance should be similar, but not always the same on each side) and also use the measuring tape as a guide to see how straight the line is from divot to bridge feet to the other divot. Then, every month or so, check the distances to see if there are any tendencies to pull one way or the other, as well as to have some reference if your bridge falls down and you need to put it up yourself. Using the wear marks on the face sometimes is deceptive, as many cellos have gotten them during spills down stairs or 20 year stints in someone’s cellar.
Every year
1) Take your cello into the shop you trust and have them do a once-over. They can put a warping bridge in the press, check for more sophisticated problems on the inside, adjust your soundpost (unless you’re ballsy like our friend Guanaco) if you’re unhappy with the sound or wolf tone issues, sharpen the tip of your endipn, and my favorite: a restorative cleaning.
2) I’m not one of those ritualistic string changers. Some strings last 4 months, others, much longer. There was an urban legend of a C string sounding good for 18 months when I was in college, but I have yet to see anything that robust. Still, it might be a good idea to get a fresh, high-quality A string at least once a year, and also make sure your lower strings haven’t gone false. (meaning the pitch rises as you apply more pressure. If you can play “Jaws” without the help of your left hand, you know your string is false.)
3) Get your bow rehaired and lubed. It’s usually more like every 6-8 months for me and depends on everything from the quality of the rehairing job to the weather, to how much you play and how gnarly your bow technique is. Have a qualified bow tech look at and straighten the stick over an alcohol lamp. I can’t tell you how much easier it was to play once they made my stick true! It felt like my bow was longer and more amenable to everything I asked it to do. Hard to believe that I played with a bent stick for 8 years!
Every now and again
1) Don’t go more than a few years without taking your axe into a shop. You don’t even have to do the repairs they suggest; take it to a number of luthiers if you suspect they are trying to wring you for money.
2) Have your fingerboard planed. As the years go by, you create a concave impression in the most trafficked areas of the cello, like 1st and 4th position. Look how skinny my fingerboard is! It’s been planed so much that it’s on its last teeny legs! When I play up past 4th, it is a little flimsy. I’ve gotten used to it, but next year I need to spend a chunk of change on a new one, which might also mean that I need a new bridge, which I just had done. Learn from my mistake! If you need to replace your bridge, see if you need a new fingerboard or a plane job done. The thickness of the fingerboard determines the height range of the bridge.
A cautionary example of what can happen if you neglect your cello:


19 Responses
Emily,
Could you please elaborate on item #3? What is an acceptable range of variance in cat length? Is it more optimal to measure sitting or standing? Should I measure nose to tail tip? Also, I have a particularly grumpy kitty with a frightful wingspan which may inhibit my measuring. Should I take her to a professional?
Smart a$s.
Nice summary, Emily!
I have a few thoughts to consider adding to your list:
I use a luthier’s polish every three months or so to clean my cello’s front, back and sides. It is surprising how much dirt and grime accumulates. I use the polish very sparingly (none on the fingerboard or neck) and I rub it in vigorously. In addition to routinely cleaning the rosin off the strings with a soft cloth (I do this daily), before I do my three-month polishing, I use a nylon kitchen “scrubby” on the bowed sections of the strings – removing a surprisingly large amount of caked-on rosin. This seems to regenerate the strings’ sound…
Your description of how to straighten and adjust the bridge is pretty much what I was doing when it fell over – causing the soundpost to fall loose. Make sure you loosen each string several tones before attempting this. I’m sure I’ll eventually adjust my bridge again, but only with EXTREME CARE!
I’ve seen a few of the [ahem] lower-cost cellos develop a problem with the endpin spool pulling partially out of the bottom of the cello. Maybe this ought to be included in the routine inspection checklist. (Along with bringing my cello to a luthier Friday to get that soundpost repositioned perfectly, I’ll also deliver a friend’s cello that has similar endpin problems.)
Finally, my post that you linked to here includes the name of a fascinating booklet by Greilsamer which provides all sorts of detailed cello measurements (as of 1910) such as nut-to-bridge distances, bridge to tailpiece distances, soundpost placement, etc.
Thanks, man! AK residents like G also need to calibrate their moose from time to time.
Frightfully detailed and complete. Can we expect more of this in your soon-to-be-published book?
(And I’m with Jennifer on the cat.)
Ms. Emily – you rock! Thanks for posting this!
NOW that’s funny! I really got a good chuckle. Who says cello repair can’t be fun?
Done! My entry of April 2 includes a picture of a well-calibrated moose.
You know, it’s sad but true: I’ve taken my cello in for regular maintenance for fifteen years, and I’ve not once taken a bow in. I am a bad and irresponsible cellist. When I get my new bow (after the 7/8 purchase) I will institute a new bow-maintenance rule.
I don’t use polish; the one time I did I used only a drop and it still clouded the varnish, no matter how much I rubbed. Lemon oil was friendlier and worked like a charm, removing dirt and not adversely affecting the integrity of the varnish. (I believe luthiers use orange?)
Also, it is imperative to ensure your cat is correctly sized in order to assure a perfect fit between it and your cello case whenever the cello is out of it. Colour-matching or -complementing between cat and case gains extra points.
Last pic made a non-cello person laugh 🙂
OMG – that was GREAT! Your “cautionary tale” pic is a classic, and almost made me up-chuck my coffee! Quick question – do you recommend a particular luthiers polish?
Brian
I don’t, because I am afraid that I’ll do something bad to my cello’s varnish. Although on my stunt cello (for sale now, if anyone has an extra $7500) that is modern and has a more robust finish, I’ll use that Kohr stuff and it works splendidly. You might email Guanaco, as he is quite the tinkerer.
If that’s even a word.
I use a polish provided with my cello by Ifshin, called “Supersensitive Polish” made by the Musical String Co. This is their website . I believe that Johnson Strings also sells a similar product.
I don’t know if I’d use it on a really old instrument – mine was new…
Thanks Emily/Guanaco!
I have calculated Ardala’s volume (roughly 2.8 bushels) but she refuses to allow me to measure her, as a protest against “fascist BMI standards” as she puts it. Hopefully this will suffice.
Also, thanks for the reminder – I spent some time yesterday getting the rosin crud off my strings. Much improved!
You are too funny! I am allergic to cats but I will perform the above measurements on a friend’s cat.
This post so perfectly sums up why (IMO) your blog consistently succeeds: wit, wisdom, humor and daring. The Venus Fly-Trap cello case photo is singularly victorious. Thank you, Emily Wright, for educating, for lightening the daily load, for your commentaries on perpsective.
PDR, you are most welcome. It’s a two way street. I get so much out of having to articulate what I experience PLUS I happen to have some very thoughtful and clever readers who help do my job better and even cheer me up when it’s been a tough one. Thanks!