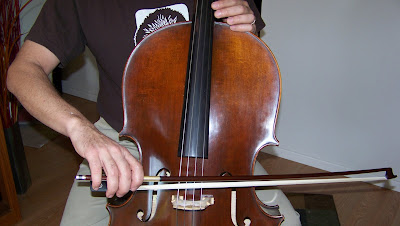
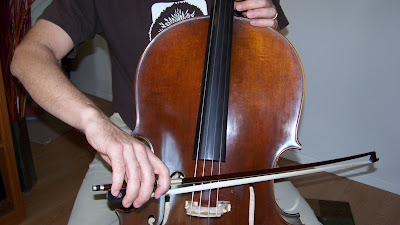
Bow Month lives! Thanks to Terry and his wife for taking the time to chronicle yet another bow grip. One thing I notice is that the kind of student who lives in the world of cello blogs AND is likely to be interested in the habits, adjustments, and solutions we talk about here probably has pretty solid technique to begin with. I was talking with Francy, one of my advanced adult students, and came to the realization that often times simply noticing an issue is nearly problem: solved.
Take our friend Terry, who writes, “I can’t say I have any discomfort issues. I do notice on double stops things tighten up considerably. More than can be accounted for by just an additional string, I’m guessing I need more accuracy and less unintended forcing. I feel my problem, instead, is a sort of slipping out of a power position, such that I can’t apply index finger effectively when I need to.”
Here’s a picture of the “slipped” grip:
…many entry-level students would love to have your problem. Your grip has a beautiful foundation, and being discomfort-free is something that many professionals still wrestle with. What I see, however, is a slight tendency to be what I call “inside out”. Being inside-out definitely takes you away from the index finger (power) side, and it is, aside from thumb tension, the most common issue student cellists face.
The first thing to do is the exercise I prescribed a few posts ago, gratuitously pasted here:
Sit at the cello with your bow on the D string, near the tip. Have a friend or teacher try to lift the bow from the string by looping a finger around the stick and pulling up. Fight them on this. You’ll immediately rotate onto the index finger to increase strength at that remote point of contact. And as you do that, your pinky will, if not come completely off the stick, make a significant gesture in that direction.
Now we’ll build on that. Find an étude (I love Schroeder’s 1st book) that you don’t struggle with that asks you to play 4 or more notes to a bow. Now move to the tip of your bow, and focus on the index finger. Play the first note group (be it 4, 6, or 8) on an up-bow. Move back out to the tip and play the same note group again, and really make sure that the pressure remains the same. If you rotate *slightly* off of the index finger (or rather lessen the intensity of the rotation) as you get to the frog, that’s ok. After you have a few up bow run thrus to cultivate the awareness of the index finger, follow with the same four notes on a down bow. This is important: the further out in the bow you go, the more intense the rotation onto the index finger gets. Then, on the up-bow, it’s a matter of maintaining that intensity, and feeling like the knuckle of the index finger leads the return journey to the frog. There should be a feeling of flexible traction on the index finger: it holds its place, and is flexible: but not like a jellyfish. More like a tire. Sure, it moves a bit when you push on it, but it is firm.
So there’s that.
Let’s address the arm, and make sure that your technique there does you as many favors as is possible. Let’s do like we did before, and start at the tip of the bow. When you’re out there, be sure your shoulder is neutral (not shrugging, even a little) and that your elbow is above your wrist. One degree above is adequate: some cellists overcompensate and hurt a rotator cuff. Leaning on your index finger, try to use just your elbow hinge to move the bow until about the center point. I often liken this movement to the Scarecrow’s arms from from the Wizard of Oz. (I searched YouTube for the scene and came up empty) Then, from the middle of the bow to the frog, your biceps should move closer to your body and the angle of your elbow remains the same. At the frog, the inside of your elbow should be really close to the body of the cello. The down bow is just the return journey. “Saw” with your arm at a uniform angle until about the middle (it will be different for people with long or short arms…this is about physiological efficiency and comfort, not looks) and then open the elbow and crank onto that index finger as you move to the tip. No matter what length your arms are, you should never need to straighten or strain your arm at the tip.
Give this a try, and I will take some photos in the next day or two to demonstrate this more effectively. Let me know if this is of any assistance!
Oh, and I will do a whole entry on double stops. Let’s just say that the right hand tends to sympathize a little too much with the left hand during double stops. Look to relax the left thumb and then your right should follow suit.


2 Responses
Thank you muchly — Ok, make like tire, not like jellyfish! Hmmm, as with everything else, that will take a while to soak in. In my beginner days, I certainly had the stereotypical dent in the thumb and tight hold. Then I aspired to the dead hand, with fingers nearly flapping in the breeze. So now I need to stay soft like rubber, but firm like Goodyear.
I’ll start with your suggested exercises this afternoon. Thanks again.
Looking forward to trying this. Thanks!